How to Use Pensend's Deep Writer Agent: Complete Guide
Step-by-step guide to using Deep Writer, the agent that turns a topic and editorial focus into a full LinkedIn article written in your voice.
Deep Writer is the second agent in Pensend's workflow. Where Trend Scanner gives you the topic, Deep Writer turns it into a complete article ready to publish on LinkedIn — with structure, arguments, and, if you've set up your voice profile, your personal tone.
The output isn't a draft that needs rewriting. It's a coherent text with a hook opening, H2 subheadings, and a strong close. This guide walks you through how to use it at every step.
What Deep Writer Actually Does
When you open Deep Writer, the agent takes three core inputs — topic, editorial focus, and length — and generates an original LinkedIn article optimized for retention and readability. Optionally, it incorporates:
- Your voice profile so the text sounds like you, not generic AI
- A personal anecdote woven naturally into the argument
- The editorial angle that carries over directly from Trend Scanner if you're continuing from the previous step
The agent doesn't improvise: each editorial focus has a defined structure that directs how the article is built. That's what separates a generic text from one with real editorial intent.
Step 1: The Starting Point — Topic and Angle
The first field is the topic: the phrase that defines what your article is about. It can be broad ("the future of remote work") or very specific ("why short feedback loops work better in distributed teams").
The second field is the angle (optional): the specific point of view or stance you want to develop. The sharper the angle, the more direct and opinionated the output.
If you're coming from Trend Scanner, you don't need to type anything. The sidebar shows your recent scans: click any trend and the topic and angle load automatically into the form. It's the direct handoff between agent 1 and agent 2 of the workflow.
If you're starting from scratch, use this as a starting point:
[Observable problem or situation] + [Your position on it]
For example:
Topic: "The productivity trap in sales teams" Angle: "Optimizing internal processes before adding pressure to the team is always more profitable long-term"
Step 2: Choose Your Editorial Focus
This is the step that most changes the output. The editorial focus defines the internal structure of the article: how it opens, how it develops, and how it closes. There are six options:
-
💡 Opinion piece — You state a clear thesis in the first paragraph and defend it throughout the text. Works well when you have a defined point of view on a topic in your field.
-
📖 Real story — The article opens with a specific anecdote or scene that hooks from the first line. The narrative carries the argument to its conclusion. The most effective approach for humanizing a technical or abstract topic.
-
❓ Uncomfortable question — The article nobody dares to write. It opens with the question the industry avoids asking, names it directly, and doesn't soften the conclusion. The format with the highest potential to generate conversation.
-
🗺️ Practical guide — Each section delivers one concrete, actionable step. No vague advice. Works best when the reader is looking for "how to do it" rather than "why it matters."
-
📊 Trend analysis — Covers what's happening, why now, what it signals for the sector, and one concrete implication the reader should act on. The natural fit for topics that come from Trend Scanner.
-
🔄 Counterargument — Opens by fairly representing the dominant view, then systematically dismantles it with evidence and a stronger alternative. Requires you to have a real position to defend.
You can only select one. If you're unsure, Trend analysis and Opinion piece are the most versatile for LinkedIn.
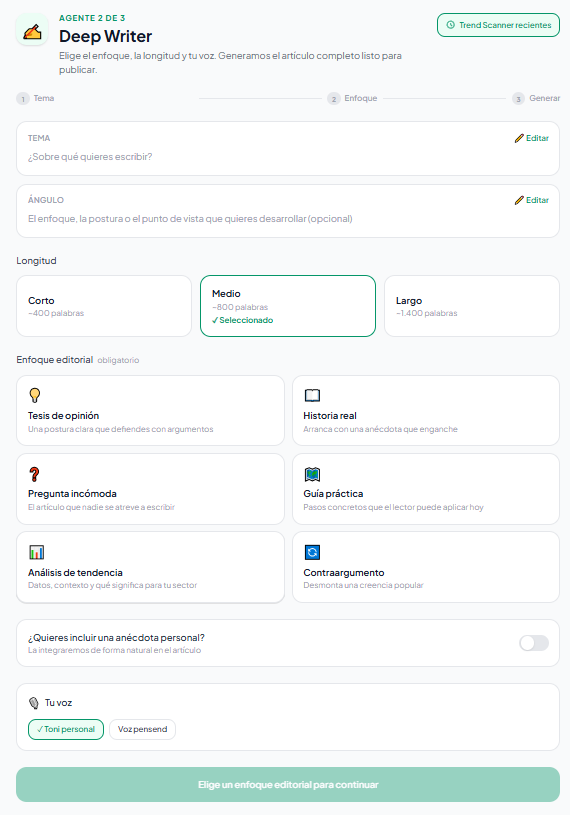
Step 3: Set the Article Length
There are three length options, each with a different editorial purpose:
-
Short (~400 words) — Available on all plans. For concise arguments that get straight to the point. Works well with opinion piece or uncomfortable question formats.
-
Medium (~800 words) — Available on Professional and Creator. The balance between idea development and reading time. The most widely published long-form format on LinkedIn.
-
Long (~1,400 words) — Available on Professional and Creator. For step-by-step guides, deep analyses, or topics that need extensive context before reaching the conclusion.
If you're on the Explorer plan, you can try the agent with the short format. Medium and long lengths are available from the Professional plan onwards.
Step 4: Add Your Voice
This is the step that separates a generic article from one that sounds like you.
Voice profile (Pro): If you've set up a voice profile in the Your Voice section, it activates automatically. The agent reads it before writing and adapts the tone, vocabulary, and style to how you actually write. On the Creator plan with multiple profiles configured, you can choose which one to use for this generation.
Personal anecdote (Pro): If you want the article to include a personal story, toggle the switch on and write it rough — it doesn't need to be polished. The agent will weave it naturally into the argument, without introducing it as "my personal anecdote" or breaking the text's tone.
Example of a rough anecdote: "In 2022 I lost an important client because I assumed they'd understood the brief without confirming it. It wasn't a technical mistake — it was a communication one."
If you don't have a voice profile set up, the content is generated in a well-written but professionally neutral tone.
Step 5: Generate the Content
With the fields filled in, click Generate content →. The process takes between 15 and 30 seconds depending on the chosen length.
During generation you'll see an animated progress bar and messages reflecting the phases of the process: analyzing the focus, developing the arguments, applying the voice profile, reviewing coherence.
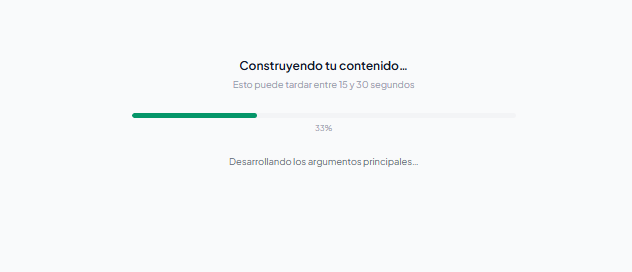
The agent builds the text from beginning to end before showing it to you. When it finishes, the result appears all at once.
Step 6: Read, Edit, and Publish
The result appears in a reading card with the full text, word count, and three main actions:
- Copy — copies the text to your clipboard in one click.
- Regenerate — launches a new generation with the same parameters. Useful if you want to see another version or if the result doesn't quite land.
- Use in Broadcast → — transfers the article directly to the third agent in the workflow. Broadcast will adapt it to multiple formats: condensed LinkedIn post, Twitter thread, newsletter, or email.
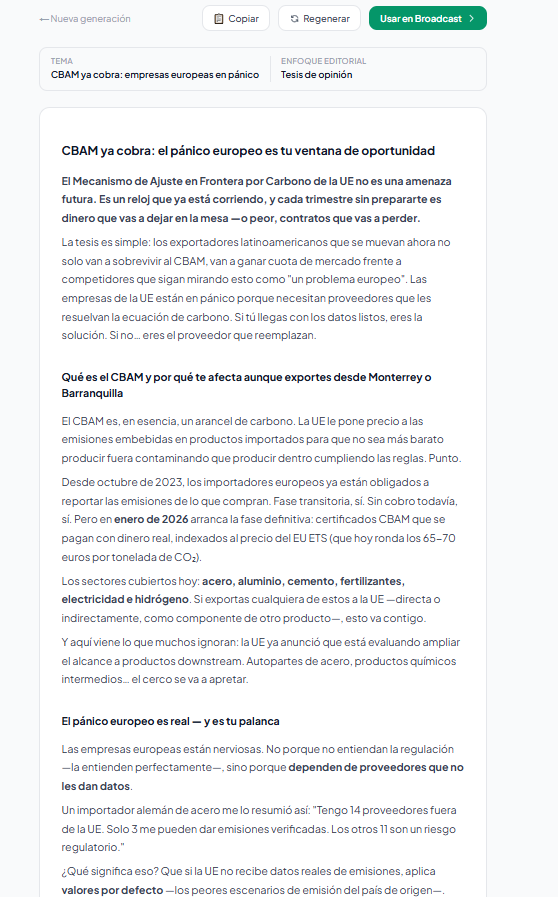
The article isn't meant to be published as-is without reading it. Read it, adjust the two or three points where your voice gets lost, and publish. 90% of the work is already done.
Deep Writer is built to eliminate the blank page from LinkedIn content creation. The editorial focus forces you to decide what kind of article you want to write before generating it — and that decision is what gives the output intent, not just words.
Continue reading
Create LinkedIn content in your voice with AI
Trend Scanner, Deep Writer, Slide Writer and Broadcast — four agents, one workflow.
Start for free